Cloud Infrastructure Pipelines

Terraform is a good tool for cloud infrastructure, especially more recent versions with backends for locking state files in Amazon, Azure, and Google clouds. It provides a level of independence that is still somewhat cloud specific but better than having to learn the templating languages of each cloud platform. But where cloud infrastructure automation falls down is scalability and implementing best practices for development.
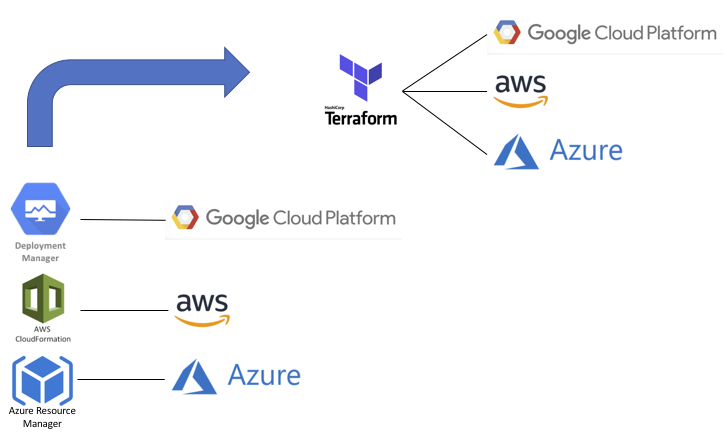
Imagine having to write Terraform code for hundreds of applications and environments during a major cloud migration. How many teams would have to learn and maintain Terraform code? There would be “fill-in-the-blanks” templates but still a manual and error-prone process. Using Jinja templates could address some of the manual process by generating the Terraform code with a YAML file for input variables. Or even skip Terraform and generate Cloud Formation or ARM templates if the focus is on a single cloud provider.
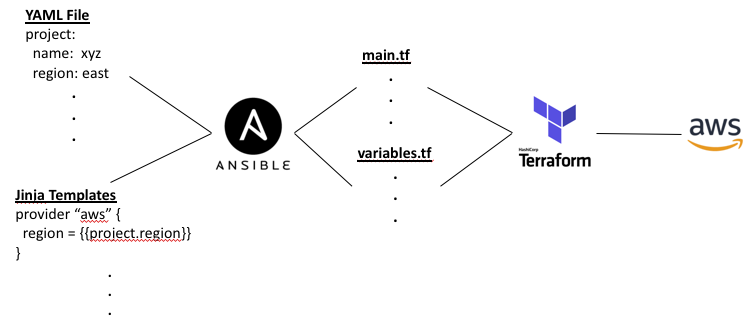
Which language to use for running the Jinja templates? Ansible seems the natural choice but Python or Salt are also options. And why use Terraform at all? Ansible has modules similar to Terraform for all the major cloud providers. But unlike Terraform or the native template engines of the cloud providers, Ansible does not keep track of state. Instead it discovers state each time the playbook is run. Typically the playbook itself or companion YAML files represent the state of the cloud infrastructure. But without an external state representation, we cannot “plan” our changes before we “apply” them or check configuration drift from manual changes made via the console.
The Jinja templates would generate consistent terraform code, perhaps two files, a main.tf and variables.tf, to follow best practices. But creating the YAML file would be still a manual process. To address that, perhaps the YAML file could be generated by Jinja templates as well, making this a two-stage templating process. But where do inputs come to create the YAML file, if not by manual edits?
A file generated with “fill-in-the-blanks” still requires manual edits in the first templating stage. To explore the tradeoffs of further templating, a quick detour to the world of fashion may help.
Tailoring
When discussing infrastructure automation, it is common to talk of tailoring environments:
- An “off the rack” product or service offers only in predetermined sizes.
- The “made to measure” approach modifies a blueprint or template based on a handful of parameters.
- A “custom” solution measures every parameter to fully tailor the solution.
- The term “bespoke” (British for “spoken for”) implies a more hand construction and less automation.
The equivalent for cloud automation might be:
- Selecting the App Service Plan when using the Azure WebApp determines the size and performance of the environment.
- Using parameters with AWS Cloud Formation or Azure Resource Manager templates to tailor the environment.
- Creating Terraform or Ansible scripts that defines the infrastructure – IP addressing, Load Balancers, Security Groups, Gateways, Instances, etc.
- Using the console to configure every option, maybe export a template of the environment to restore if necessary.
So what level of tailoring is practical at scale? Probably somewhere between “make to measure” and fully “custom”. A pipeline that generates custom scripts from parameter inputs and templates seems the best trade-off. And it allows for ongoing customization (like new firewalls rules) with updates to the templates and regeneration.
Pipelines
Cloud Infrastructure Pipelines have multiple stages:
- Populate takes inputs from various sources to create custom files and directory structure for the new project
- Generate uses template languages and variable file inputs to create tailored scripting for the project
- Build executes the generated code within each of the multiple subdirectories of the new project

The inputs for the YAML variables might come from individual parameters, a text field, or service request. If the inputs are too specific, then it might appear easier to create a custom scripts but that does not scale. Instead, limit the inputs to questions like:
- Public facing?
- Sensitive data?
- Multiple regions or availability zones?
- Multiple applications per infrastructure?
For resource sizing questions (networks, databases, etc.), think T-shirts (Large, Medium, Small, …) and map those sizes to whatever is appropriate for the type of resource. Inputs can also be used to select global firewall rules or allow access to protocols like SSH or RDP. Bundle global rules into modules if the scripting language supports it. Updates to the modules can be propagated across the code base without regenerating scripts. Application specific firewall rules might still be handled with the same templating framework in a separate pipeline with its own service requests.
The second stage of templating combines the YAML variable files created by the first stage with Jinja templates to generate the code used to build the infrastructure. But items like resource names that are only calculated during the generate stage often need to query or save data to external systems. Depending on the templating language, there are options like filter plugins in Jinja or custom resources for Cloud Formation, that can invoke code to perform external actions. For example, assigning an IP address range to a dynamically generated subnet name.