How to use AI for Drone Face Detection
There are many ways computer vision is used in business. For example, in manufacturing, performing anomaly or defect detection can be incredibly effective for higher quality control. For retail, computer vision can anonymously detect traffic flow from a video stream in a store and analyze dwell to understand popularity and queues to increase customer satisfaction.
But the most fascinating and controversial aspect of computer vision, in my opinion, is face detection. This is where advanced biometric algorithms are used to detect and recognize individual human faces from images or video streams.
The purpose of this blog is to document the journey of implementing face detection AI on a consumer-grade drone.
Concepts and Approach of Drone Face Recognition
While there could be some controversy over face recognition, we’re going to set that aside for the purposes of this blog. Let’s look at how face detection can be harnessed to allow a drone to follow a face. While there are many tools to choose from, I'll be using the CVZone library, which is a high-level library built on OpenCV and Mediapipe libraries.
The foundation of my work is based on CVZone's face detection technology that uses deep learning neural network machine learning models (machine learning and AI) to identify and locate a face in real-time in an image or video stream.
Using an inexpensive Tello Mini Drone Quadcopter, I can stream HD video from the drone to a base station via a WiFi network. Using a GPU and CVZone on the base station, I analyze each frame of the video to detect a face. (question: need a diagram here of drone and base station?)
For face tracking, we'll use a simple approach. From a still frame from our video, CVZone can dynamically put a bounding box around the face and provide rich information regarding the box location and size in the overall video frame.
Most of the code and effort is focused on programmatically moving the drone to center the detected face into the center of the video frame. If the face moves, the code will continue tracking the face and adjusting to keep the face in the center of the video frame. So first up is how do we find center given a detected face bounding box.
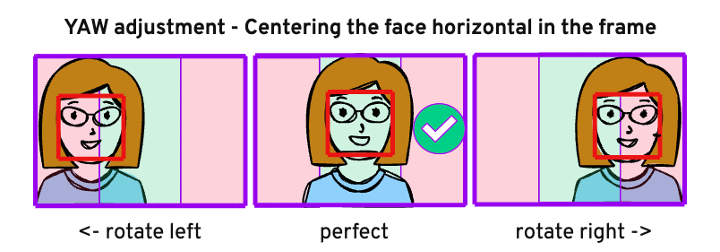
Centering horizontal: To calculate whether the frame is centered horizontally vs the detected face bounding box is too far to the left or right, we simply get the center of the bounding box and compare it to the horizontal center of our video frame, and adjust left or right, using the drone's YAW/rotation. If the detected face bounding box is too far to the left as compared to center, the drone needs to YAW to the left. If the detected face is too far to right as compared to center, the drone needs to YAW right. This horizontal centering technique is depicted in figure 1.
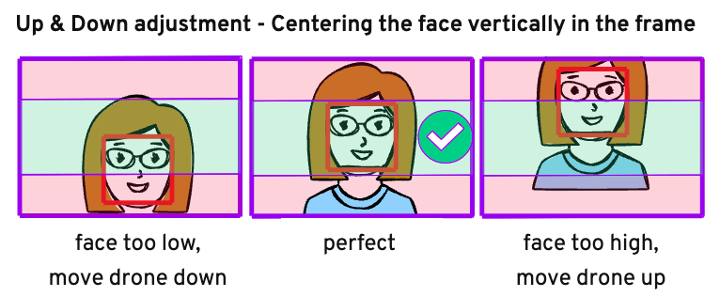
Centering vertically: To calculate whether the frame is centered vertically vs. the detected face bounding box is too far up or down, we simply get the center of the bounding box and compare it to the vertical center of our video frame and adjust the drone up or down as appropriate. If the detected face bounding box is too low as compared to center, the drone needs to move down. If the detected face bounding box is too high as compared to center, the drone needs to move up. This vertical centering technique is depicted in figure 2.
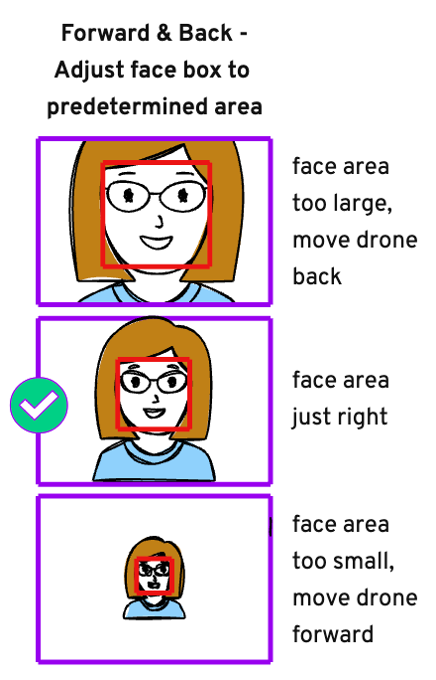
Centering forward/back: I can easily calculate the pixel (px) area of the detected face bounding box (by multiplying face bounding box width * height) and compare the resulting area to my target area size 30K px. I found this 30K ideal target px area size by manually finding a framing of my face and resulting bounding box frame size when the drone is about 3 feet from my face. This seems like a safe distance to operate the drone from my face. To calculate whether the drone is too close or too far from the face, we simply get the area of the bounding box in px and compare it to the target value of 30K, and adjust the drone forward or back as appropriate.
The Code for Drone Face Detection
The Python code is surprisingly straightforward. Note, however, I've removed some of the boiler plate code to make it easier to convey the key concepts of the approach in this blog.
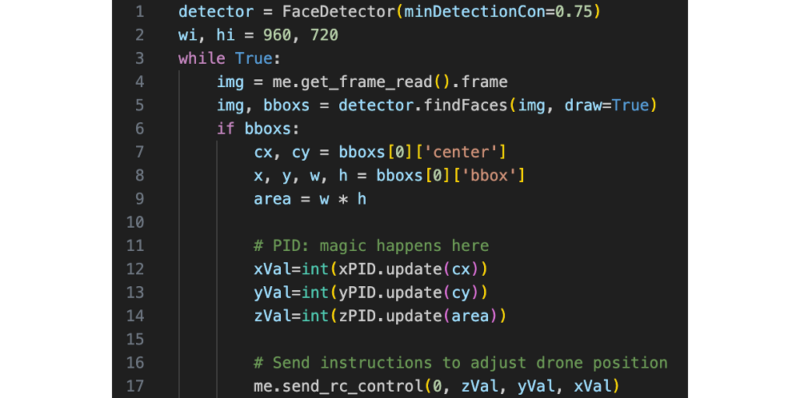
As you can see in the partial code listing in figure 4, we loop continuously and grab a frame from the video feed. Once we have this frame, we're dealing with a single image. For each image, we attempt to find a face in the frame. If a face is found, we find the face's bounding box and ultimately send control to the drone to adjust its position to better frame the detected face.
Below are some highlights from the code:
- Line 3: Loop forever
- Line 4: Grab a single frame from the video
- Line 5: Using AI, try to detect a face in the frame
- Lines 7-8: Grab the detected face's bounding box info
- Lines 12-14: Magic happens here (more on the PID later in this blog)
- Line 17: Send movement instructions to drone
And that’s it! Now you have the basic logic to control a drone to follow a face. Note, I’ve glossed over the PID on lines 12-14, but I’ll cover that in the next section.
REFINEMENT OF CONTROL VIA PID
In the previous code sample, I didn't talk about exactly what instructions we were passing to the send_rc_control() method. This method takes velocity values for left/right, forward/back, up/down and YAW/rotation. These values must be in the range of -100 through 100. Zero represents no desired movement and positive and negative numbers indicates direction and velocity of desired travel. You'll notice we pass a zero to the first parameter, therefore not asking for any change to the left/right velocity and we'll use the fourth YAW velocity parameter instead to rotate the drone left or right.
send_rc_control(self, left_right_velocity: int,

forward_backward_velocity: int,

               up_down_velocity: int, yaw_velocity: int)
So, what is this PID? Let’s take a simple example. If you were to write code that intended to keep the detected face bounding box centered horizontally (as depicted in figure 1), and you accelerated at a velocity of 100 or -100 to make your adjustments, you’d find that you would overshoot your destination and the drone would wildly oscillate left and right, never being able to stop with the face mid frame.
Rather than having the drone move as fast as possible, we instead feed in a velocity that is relative to the distance we are off from center. The further the detected bounding box for a face is off from center, the faster we will move the drone toward centering the bounding box. And the closer we are to center, the slower we will move the drone. This technique will help tremendously to reduce oscillation.
That solves our oscillation problem, right? Nope. Turns out we need to introduce one move level of control to help “tune” the velocity to ensure we don’t overshoot. This is the introduction of a Proportional-Integral-Derivative (PID) software controller. A PID is a standard industry approach and uses a control algorithm that uses feedback to regulate a process. The purpose of the PID controller is to use the feedback (how far off from center is the face detection bounding box) to match a desired setpoint (centering of the face detection bounding box).
PID controllers are all around us as they are heavily used for automation, heating and are also frequently used in robotics and even in modern automobile cruise control systems.
Interacting with a PID controller is very straightforward and is a significant reason for its popularity. You initialize the PID with your desired target value (e.g. center of screen for desired centering). And then pass in a P, I and D value for the PID initialization as you can see in the following code snippet. For my implementation, I have 3 PID controllers instantiated so I can initialize, control and tune the drone moving forward/back, up/down and YAW/rotation independently. Below is a sample of the one-time PID instantiation.
#                    P   I  D   target
xPID = cvzone.PID([0.15, 0, .1], wi//2)
yPID = cvzone.PID([0.27, 0, .1], hi//2, axis=1)
zPID = cvzone.PID([0.0007, 0, .0003], 30000, limit=[-30, 15])
For our drone implementation: Since we do not have high precision with our drone control (i.e. not down to mm or sub mm measurement), we don't benefit and will therefore omit (pass zero) for the I value.
At runtime, while tracking a face, you can think of the P value as the speed of reducing the error and getting drone to be pointed at the detected face. And D is key for smoothing the drone when it gets close to the target value (center of screen for horizontal positioning) and eliminates oscillation.
xVal = int(xPID.update(cx))
yVal = int(yPID.update(cy))
zVal = int(zPID.update(area))
From a development perspective, to identify the correct values, I started with a D of zero so it was not effecting the movement, and focused on getting a P value that had as little oscillation as possible. Only then did I started testing I values to eliminate the remaining oscillation. Setting the right PID values takes some experimentation, but when you get them tuned in, you will see the drone very smoothly center a detected face in the camera and have no noticeable oscillation when adjusting drone position to track a face in any direction.