How to Secure Your AWS Root Account
When you first create an Amazon Web Service (AWS) account, you begin with one Identity, which is the root user account. That makes the AWS Root account the most powerful user account in AWS.
The Root user account allows full access without any restrictions to all resources in the account. Therefore, it is important to safeguard your root user account to avoid compromise. The Root user can control every aspect of the AWS account, such as deleting other IAM user accounts entirely or denying all permissions to other Administrator IAM users. Anyone with access to the Root account can be considered the AWS account owner and no restrictive policies can be applied to the Root user.
Let’s look at how you can monitor the AWS Root user account login attempts and receive an email notification when a login attempt is detected via AWS EventBridge.
This article also demonstrates how you can create an alarm threshold that tracks the number of times the Root account is used to perform general account operations such as create stack, delete snapshot, create Role etc. A CloudWatch alarm is then triggered when the (Root account usage count is greater or equal to one). An SNS notification will be sent to notify you when the alarm has been triggered.
AWS Foundational Security Best Practices
Setting the stage for this article, you should the two AWS foundational security best practices:
- IAM root user access key should not exist
- Hardware MFA should be enabled for the root user
Securing the Root user Account
Additionally, it is important to know some ways you can secure the Root user Account, according to AWS:
- Limit the tasks you perform with the root user account.
- Avoid creating access keys for the root user
- Enable multi factor authentication (MFA)
- Set complex passwords
- Create an admin level IAM user to perform any high privilege activities
- Use a group email address for the root account
- Use a complex password for the root account
- Add a phone number to the account contact information
- Review and keep track of the Root Account access
- Document the processes for using the root user credentials
- Apply controls to monitor access to the root user credentials
- Secure and monitor the root account email and phone number
Tasks that require the root user credentials
There are several tasks that require the root user credentials. One is when you are changing your account settings. This includes the account name, email address, root user password, and root user access keys. Other account settings, such as contact information, payment currency preference, and Regions, do not require root user credentials.
Another example is when you are restoring IAM user permissions. If the only IAM administrator accidentally revokes their own permissions, you can sign in as the root user to edit policies and restore those permissions. You also require root user credentials when activating IAM access to the Billing and Cost Management console.
When you view certain tax invoices, an IAM user with the aws-portal:ViewBillingpermission can view and download VAT invoices from AWS Europe, but not AWS Inc or Amazon Internet Services Pvt. Ltd (AISPL). Additionally, you will need the root user credentials when closing your AWS account, changing your AWS Support plan or canceling your AWS Support plan.
A few more examples include:
- Registering as a seller in the Reserved Instance Marketplace.
- Configuring an Amazon S3 bucket to enable MFA (multi-factor authentication) Delete.
- Editing or deleting an Amazon S3 bucket policy that includes an invalid VPC ID or VPC endpoint ID.
- Signing up for AWS GovCloud
Receive an SNS notification when a console sign in is performed by the root user
Important: Before you begin this implementation, make sure that your AWS CloudTrail Management read/write events are set to All or Write-only for CloudWatch events to trigger the log-in event notification. Follow the steps below to implement the solution that forwards an email notification to your inbox every time a login is performed by the root user. For more information, see Read and write events.
- Copy and paste this YAML template into your favorite editor tool and then save it. This YAML template will automatically deploy all the components that creates the Root account monitoring controls.
| AWSTemplateFormatVersion: ‘2010-09-09’Description: ROOT-AWS-Console-Sign-In-via-CloudTrailMetadata: AWS::CloudFormation::Interface: ParameterGroups: – Label: default: Amazon SNS parameters Parameters: – Email AddressParameters: EmailAddress: Type: String AllowedPattern: “^[\\x20-\\x45]?[\\w-\\+]+(\\.[\\w]+)*@[\\w-]+(\\.[\\w]+)*(\\.[a-z]{2,})$” ConstraintDescription: Email address required. Description: Enter an email address to be used to subscribe to the Amazon SNS topic which will send notifications if your account’s AWS root user logs in.Resources: RootActivitySNSTopic: Type: AWS::SNS::Topic Properties: DisplayName: ROOT-AWS-Console-Sign-In-via-CloudTrail Subscription: – Endpoint: Ref: EmailAddress Protocol: email TopicName: ROOT-AWS-Console-Sign-In-via-CloudTrail EventsRule: Type: AWS::Events::Rule Properties: Description: Events rule for monitoring root user Console Sign In activity EventPattern: detail-type: – AWS Console Sign In via CloudTrail detail: userIdentity: type: – Root Name: Fn::Sub: “${AWS::StackName}-RootActivityRule” State: ENABLED Targets: – Arn: Ref: RootActivitySNSTopic Id: RootActivitySNSTopic DependsOn: – RootActivitySNSTopic RootPolicyDocument: Type: AWS::SNS::TopicPolicy Properties: PolicyDocument: Id: RootPolicyDocument Version: ‘2012-10-17’ Statement: – Sid: RootPolicyDocument Effect: Allow Principal: Service: events.amazonaws.com Action: sns:Publish Resource: – Ref: RootActivitySNSTopic Topics: – Ref: RootActivitySNSTopicOutputs: EventsRule: Value: Ref: EventsRule Export: Name: Fn::Sub: “${AWS::StackName}-RootAPIMonitorEventsRule” Description: Event Rule ID. |
- Open the CloudFormation console in the US East (N. Virginia) Region, and then choose Create Stack.
- Note: The CloudFormation stack must be created in the US East (N. Virginia) Region.
- Choose Create stack, and then choose with new resources (standard).
- Choose Upload a template file, click Next, and then Choose file.
- Choose the template that you saved in step 1, and then choose Next.
- In Stack name, enter a name that is meaningful to you, such as Root-AWS-Console-Sign-In-CloudTrail.
- In the EmailAddress entry, enter your email address, and then choose Next.
- Note: AWS sends the confirmation email to this email address.
- In Options, choose Next, and then choose Create.
- Check your email inbox for the AWS confirmation email, and then choose Confirm subscription to confirm the SNS subscription request. You’ll receive a Subscription confirmed! message.
- To test the notification, sign into the AWS Management Console with the root credentials. Then, sign out of the AWS Management Consolewith your AWS root user account.
- Check your email inbox for an AWS notification message. Note the CloudTrail recordsuserIdentity, sourceIPAddress, and MFAUsed containing details for the log-in event.
- To stop receiving notifications, delete the CloudFormation stack that you created in step 2.
Monitor and track operations performed by the root user via Alarms and Notifications
- Ensure that your CloudTrail Trail Status is set to (Logging) with Multi-Region Trail set to (Yes). For the steps on how to create a Trail see Creating a Trail in the CloudTrail documentation.
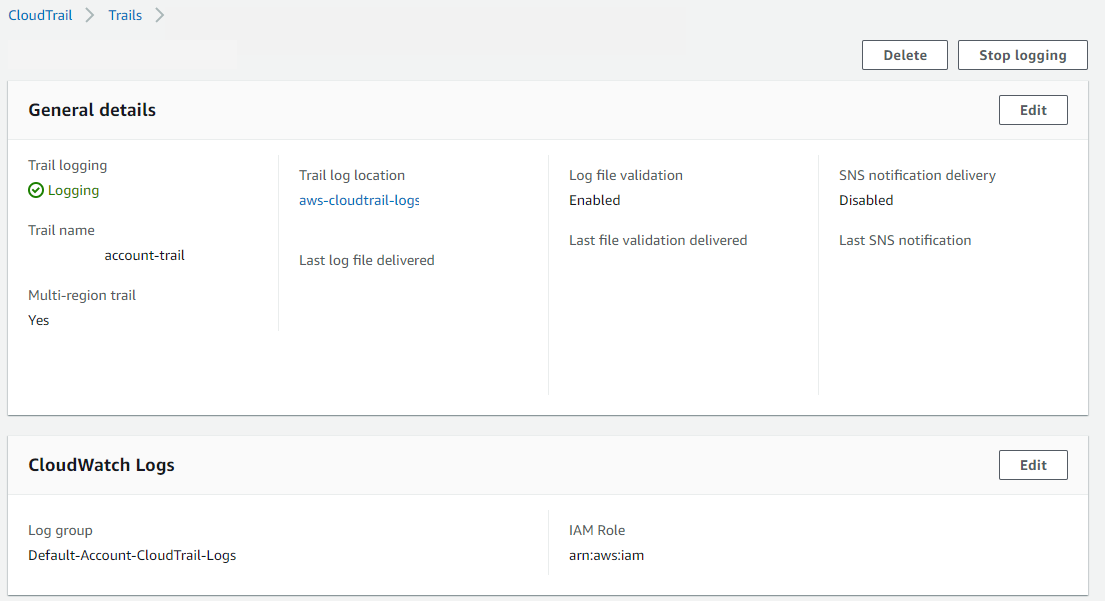
- Turn on CloudTrail-CloudWatch Logs integration while creating a Trail or modifying an existing Trail.
2. Create a metric filter
Now that you have given CloudTrail the permission to work with CloudWatch Logs, you’ll use the CloudWatch console to create a metric filter that defines the condition that you want to monitor. In this case, your filter will detect direct usage of your root account.
- Open the CloudWatch console.
- In the navigation pane, click Logs.
- In the list of log groups, select the check box next to the log group that you created for CloudTrail log events.
- Click Create Metric Filter.
- On the Define Logs Metric Filter screen, click Filter Pattern and input the following filter pattern below:
- Be sure you have typed the filter exactly as shown, and then click Assign Metric.
- Assign a metric
| { $.userIdentity.type = “Root” && $.userIdentity.invokedBy NOT EXISTS && $.eventType != “AwsServiceEvent” } |
3. Assign a metric
Next, give your filter a name and assign a metric.
- On the Create Metric Filter and Assign a Metric screen, in the Filter Name box, type RootAccountUsage.
- Under Metric Details, in the Metric Namespace box, type CloudTrailMetrics.
- In the Metric Name field, type RootAccountUsageCount.
- Click Metric Value, and then type 1.
Note: If Metric Value does not appear, click Show advanced metric settings first.
- When you are finished, click Create Filter.
4. Create an alarm
Now, create and specify thresholds for your alarm, and an email address to which an SNS notification will be sent whenever your alarm is triggered.
- On the Filters for <Your_Log_Group_Name>page, select the metric filter in question and click Create Alarm.
- On the Create Alarm page, provide values for the numbered fields shown in the following screenshot. The screenshot below contains the values that I used to create the alarm.
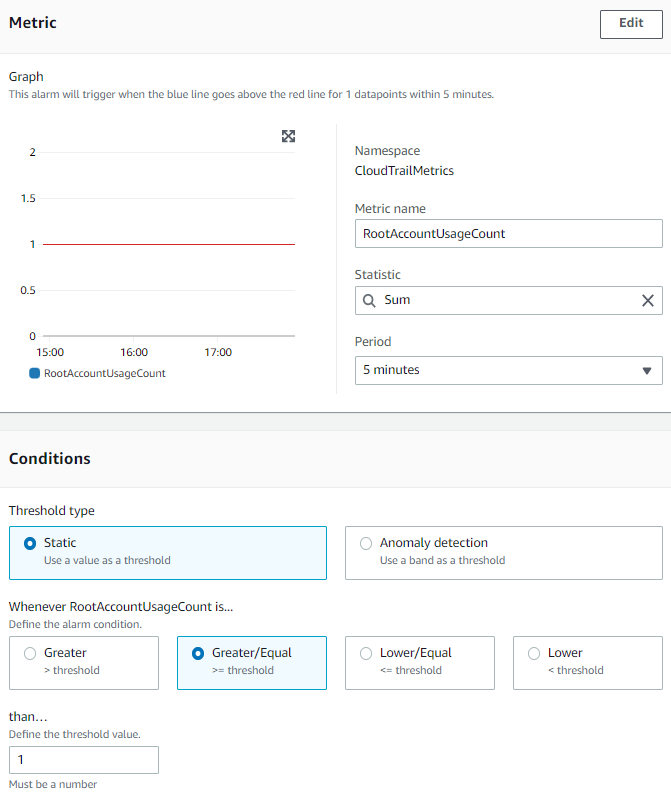
You can change these values to fit your requirements, but it’s best to stick with a period of 5 minutes or more, and use the Statistic value of Sum. However, you might want to change the RootAccountUsageCount to be greater than one, depending on your requirements.
- From Step 2 of the CloudWatch Alarm configurations specify the SNS topic to receive notifications when the Alarm is triggered.
- When you are finished with steps 3 and 4, click Create Alarm. You will be asked to confirm your email address.
- In the email that you receive, click Confirm Subscription. In the confirmation dialog, a green arrow appears next to your email address. You’re done with this step and can close the dialog.
- Optionally Create the metric filter and CloudWatch Alarm using the AWS CLI
| To create metric filter put-metric-filter –log-group-name <value> –filter-name <value> –filter-pattern <value> –metric-transformations <value>
To create Alarm aws cloudwatch put-metric-alarm –alarm-name <value> –metric-name <value> –statistic Sum –period 300 –threshold <value> –comparison-operator <value> –evaluation-periods 1 -namespace ‘<give the name space>’ –alarm-actions <sns_topic_arn> |
6. Test the alarm and receive an SNS notification
To test your alarm, login into the AWS account using the Root user credentials and perform some actions with your root account. For example, you can spin up an Amazon EC2 instance or delete an EBS Snapshot. The alarm will also be triggered when the Root user Access key is used to login and perform some actions. After performing such actions, you will receive an SNS email notification.