Part 4: Internationalization in Spring Boot

One of the many features provided by Spring Boot’s automatic configuration is a ResourceBundleMessageSource. This is the foundation of the support for internationalization provided by Spring as part of Spring Boot. However, resolving the user’s current locale, and being able to switch locales on demand is a little trickier, and is something that I had a hard time finding a comprehensive example of. In this installment, we’ll cover how to set up a resource bundle for messages, how to name them to support locales, and finally, how to wire a LocaleResolver and LocaleChangeInterceptor into our test application so that we can implement and test Spring’s internationalization support.
As usual, for this installment, I’ve created a copy of the code from Part 3 and created a new project called Part 4. It’s committed to Github, ready for cloning. You can start from the beginning of this blog series at Beyond the Examples.
The Resource Bundle
First, we’ll create a resource bundle with message files for English and Spanish in our sample application. When provided a locale, the auto-configured message source can dynamically look up a message file using a default base file name – for example, the default messages file will be named “messages.properties”, whereas the file for Spanish messages will be called “messages_es.properties”. Likewise, the file for English language messages will be “messages_en.properties”. Basically, the message source resolves the file name in which to look for message properties by concatenating Spring’s default base file name “messages”, with an underscore and the locale name. The default location for these files, as specified by the auto-configuration, is “/src/main/resources”.
Create two files in /src/main/resources: messages_en.properties, and messages_es.properties.
We’ll add a couple of messages to each file, and we’ll use them to change the labels on our sample application’s based on the client’s locale.
Update “/src/main/resources/messages_en.properties”, adding the following properties and values:
/src/main/resources/messages_en.properties:
[code language=”java”]
field1 = Field 1
field2 = Field 2
[/code]
and likewise, for our Spanish clients, update “src/main/resources/messages_es.properties” to include the Spanish versions of the same properties and values (note that I do not speak Spanish. I typed these names into Google Translate. I think they are accurate enough for this example)
/src/main/resources/messages_es.properties:
[code language=”java”]
field1 = El Campo 1
field2 = El Campo 2
[/code]
Updating The View Template
The view template will need to be updated with placeholders containing the keys that Thymeleaf can use to swap in values from our message files. We’ve seen usages of ${} and *{} in these tutorials. The next one we’ll use is #{}, which is the placeholder Thymeleaf uses to bind messages, and can be used to do general string manipulation within the view.
Update our view template to include two new placeholders such that:
/src/main/resources/hello.html
[code language=”html”]
<!DOCTYPE html>
<html xmlns="http://www.w3.org/1999/xhtml" xmlns:th="http://www.thymeleaf.org">
<head lang="en">
<meta charset="UTF-8" />
<title>HELLO</title>
</head>
<body>
<p th:text="${message}"></p>
<form id="gizmo-form" role="form" th:action="@{/save}" method="post" th:object="${gizmo}">
<div>
<label for="field1" th:text="#{field1}"></label>
<input type="text" id="field1" name="field1" th:field="${gizmo.field1}"/>
</div>
<div>
<label for="field2" th:text="#{field2}"></label>
<input type="text" id="field2" name="field2" th:field="${gizmo.field2}"/>
</div>
<div>
<ul>
<li th:each="item, stat : *{children}" class="itemRow">
<div>
<label th:for="${‘childField1-‘+stat.index}">Field 1</label>
<input type="text" class="form-control quantity" name="childField1"
th:field="*{children[__${stat.index}__].childField1}" th:id="${‘childField1-‘+stat.index}"/>
<label th:for="${‘childField2-‘+stat.index}">Field 2</label>
<input type="text" class="form-control quantity" name="childField2"
th:field="*{children[__${stat.index}__].childField2}" th:id="${‘childField2-‘+stat.index}"/>
</div>
</li>
</ul>
</div>
<div>
<button type="submit">Save</button>
</div>
</form>
</body>
</html>
[/code]
You can see we’ve removed the label text (formerly “Field 1” and “Field 2″ for the ‘field1’ and ‘field2’ properties on the Gizmo object and added new th:text references containing our new binding types. In these cases, our goal will be to replace #{field1} with the value of the “field1” property in the appropriate messages file, and to replace the value of #{field2} in a similar fashion. If you were to start the server at this point, the solution would still not work. The last step ties the views to the message files.
Configuring The LocaleResolver
In order for Spring to know which message file’s values to make available to Thymeleaf, the application needs to be able to determine which locale the application is currently running in. For this, we need to configure a LocaleResolver.
In ‘src/main/java/com.rodenbostel.sample.Application.java’ file, configure a new LocaleResolver bean.
[code language=”java”]
@Bean
public LocaleResolver localeResolver() {
SessionLocaleResolver slr = new SessionLocaleResolver();
slr.setDefaultLocale(Locale.US);
return slr;
}
[/code]
This will configure a locale resolver that fits the following description, according to the Spring API:
“Implementation of LocaleResolver that uses a locale attribute in the user’s session in case of a custom setting, with a fallback to the specified default locale or the request’s accept-header locale”
The only item remaining is how to switch the locale without updating the configuration of the bean above and restarting our server or changing our default or accept-header specified locale.
Configuring a LocaleChangeInterceptor
Configuring an interceptor that is responsible or swapping out the current locale allows for easy testing by a developer, and also gives you the option of including a select list in your UI that lets the user pick the locale they prefer. Add the following bean to your ‘src/main/java/com.rodenbostel.sample.Application.java’ file:
[code language=”java”]
@Bean
public LocaleChangeInterceptor localeChangeInterceptor() {
LocaleChangeInterceptor lci = new LocaleChangeInterceptor();
lci.setParamName("lang");
return lci;
}
[/code]
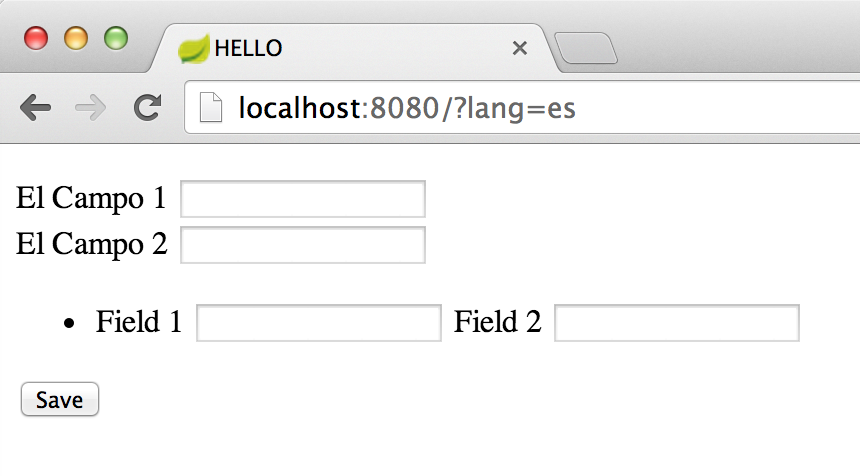
As you can see, this interceptor will look for a request parameter named ‘lang’ and will use its value to determine which locale to switch to. For example, adding ‘lang=en’ to the end of any request will render the messages from default English locale’s message file. Changing that parameter to ‘lang=es’ will render the Spanish version. For any interceptor to take effect, we need to add it to the application’s interceptor registry. In order to do that, we need to get a handle and override Spring Boot Web’s addInterceptor configuration method.
In order to do that, we need to update our ‘src/main/java/com.rodenbostel.sample.WebApplication.java’ file to extend WebMvcConfigurerAdapter. The WebMvcConfigurerAdapter’s existence is based on around activities such as this. It provides hooks to override base Spring configuration. Let’s update the class to extend this super class and add our interceptor:
[code language=”java”]
package com.rodenbostel.sample;
import org.springframework.boot.SpringApplication;
import org.springframework.boot.autoconfigure.EnableAutoConfiguration;
import org.springframework.context.annotation.Bean;
import org.springframework.context.annotation.ComponentScan;
import org.springframework.context.annotation.Configuration;
import org.springframework.web.servlet.LocaleResolver;
import org.springframework.web.servlet.config.annotation.InterceptorRegistry;
import org.springframework.web.servlet.config.annotation.WebMvcConfigurerAdapter;
import org.springframework.web.servlet.i18n.LocaleChangeInterceptor;
import org.springframework.web.servlet.i18n.SessionLocaleResolver;
import java.util.Locale;
@Configuration
@EnableAutoConfiguration
@ComponentScan
public class Application extends WebMvcConfigurerAdapter {
public static void main(String[] args) {
SpringApplication.run(Application.class, args);
}
@Bean
public LocaleResolver localeResolver() {
SessionLocaleResolver slr = new SessionLocaleResolver();
slr.setDefaultLocale(Locale.US);
return slr;
}
@Bean
public LocaleChangeInterceptor localeChangeInterceptor() {
LocaleChangeInterceptor lci = new LocaleChangeInterceptor();
lci.setParamName("lang");
return lci;
}
@Override
public void addInterceptors(InterceptorRegistry registry) {
registry.addInterceptor(localeChangeInterceptor());
}
}
[/code]
Testing
Start your server and observe the default locale in action:

then, add our request parameter and refresh the page to change the locale so that our Spanish language file is loaded:
As Spring Boot matures, I’m sure the available examples will be updated to include end to end samples such as this. In the mean time, I hope you found this simple example useful. Check back soon for Spring Security integration in Part 5.