Working with Azure DevOps TFVC to Git ‘Tip’ Migrations

If you’re embarking on a repository migration, here are some tips and lessons learned from my recent experience migrating close to 100 repositories from TFVC to Git within Azure DevOps.
In this case, each TFVC Repo was already located in its own project on Azure DevOps. I wanted to perform a migration to a new Git repo under the same Org and Project while maintaining the original TFVC Repo.
Getting Started
In searching through Microsoft’s documentation, I discovered the Azure DevOps Import Tool. It allows you to import one repo, either Git or TFVC into a new Git repo. After some finagling as to how to format the destination path, this process was relatively straightforward for a tip migration, i.e. a migration of only the most recently committed code.
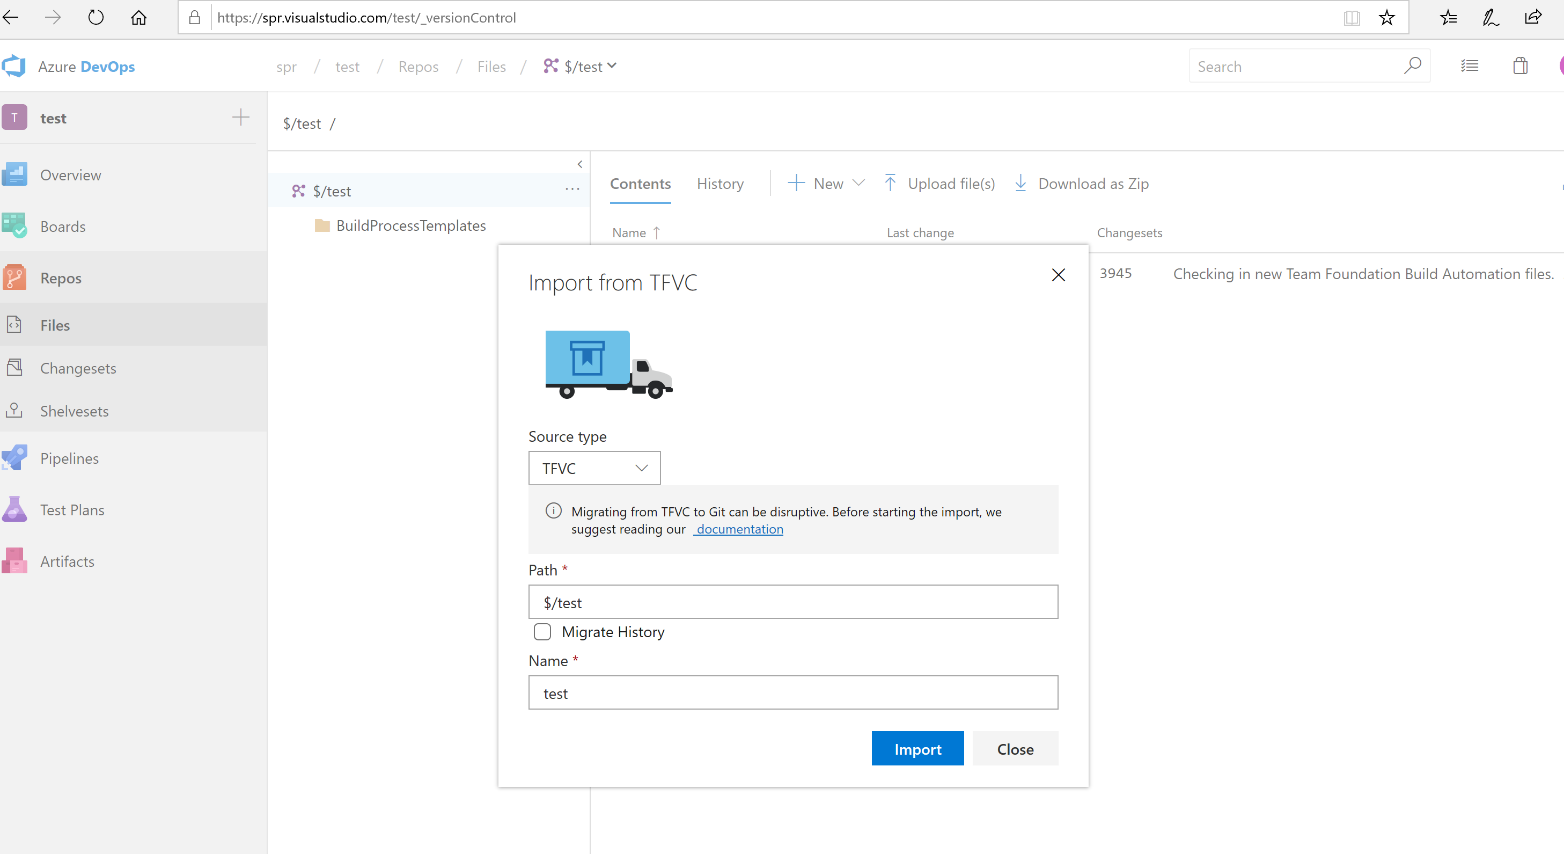
Word of caution: Although the tool has a checkbox for “Migrate History”, the documentation recommends against using this option. Since I was maintaining the original TFVC Repo, I didn’t include history.
By using this tool, I was able to avoid having to download each repo locally. Assuming all validation rules are met, the migration takes place directly on the cloud. Once the migration was kicked off, I redirected my browser to focus on the next migration task. Anywhere from several seconds to several minutes later, depending on the size of the repo, I would receive an email notifying of a successful upload.
ADO Import Tool Steps
Prerequisite: Make sure you are given full admin rights to all of the projects you want to migrate.
- Navigate to the “Repos” section of the project that will hold the new repository. In this instance, the source and destination projects were the same.
- Select “Import Repository” from the top source control menu as shown:
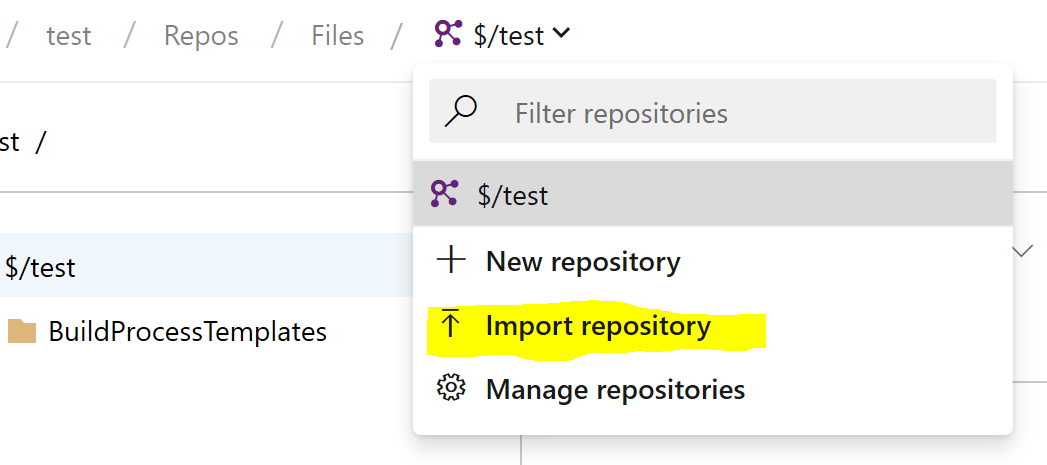
- Complete the popup form as follows:
- Source type: TFVC
- Path: $/NameOfMyTFVCRepo (note: other examples I saw showed 2 levels in the path. If you have more than one open branches, it will be $/NameOfMyTFVCRepo/NameOfBranch).
In a couple of instances, I received a validation error message that no file can be larger than 50 MB in a repository. If one is able and willing to remove the large files from the source TFVC repo, of course this could be an option.
I also looked to see if there was a file size maximum in Settings at the Project or Org level that could be changed but found none. However, I did find a workaround process so that all files could remain in the repo.
Potential Workaround for a tip migration if Import Tool fails
- If you do not have GIT on your machine, you will need to download and install it: https://gitforwindows.org/
- Create a new empty repository on ADO by selecting “New Repository” from the repo menu on the top menu bar and completing the fields in the popup window.
- Save the contents of the TFVC repository locally, either by doing a Get Latest on project in VS Team Server Explorer (setting up your local path if it’s the first time), or by navigating in ADO to the TFVC Repository, and selecting “Download as Zip”, then extracting the contents from the zip file.
- Open the Windows command prompt and navigate to the top level directory of the project. Create local GitRepo for contents, add, and commit the files as follows:
git init
git add –all
git commit -m “initial commit for Git Migration”
(Keep the command window open at the current path).
- In ADO, navigate to the empty Git repository that you created in Step 2, and copy the URL to the clipboard.
- Add the origin and push your local contents to the ADO Git Repository by typing the following in your Command prompt window:
git remote add origin [URL of Git repo copied in step 4]
git push -u origin –all
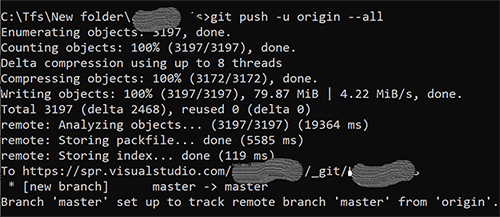
You should see confirmation that all files were written to your ADO location. By refreshing your web browser on the page of your project’s Git Repo, the contents will appear.
Nice-to-Have: Means of Automating Migration of Many Intra-ADO Repositories or Expansion of Import Tool functionality
As I had close to 100 repositories to migrate in total, I wanted to create a process that would iterate through each of our Projects on ADO. My goal was to migrate each one using a process like the one used by Import Tool, where the files remain on the Cloud.
Unfortunately, my research kept leading me down a dead-end road. There are multiple tools or APIs that can be used for migration such as Git-Tfs command interface or Azure DevOps REST API But, I found no examples using an ADO URL as the TFVC Source. Despite attempts to press ahead, these methods did not work for me, most likely because my TFVC Source was on ADO.
So I created a Feature Request and follow-up comment with Microsoft. The best solution would probably be what I mention in my follow-up comment – that the Import Tool be expanded to allow for multiple projects to be migrated following a set naming convention, and in response to a single webpage submission.