Part 3: Form Binding

Welcome back. In Part 1 of this series, we set up a sample application using Spring Boot and some of it’s default configuration options. Now that we have Thymeleaf view templates rendering in our Spring Boot test app (see part 2), the next logical topic is learning how to bind Java objects to forms in these views for processing. In this installment, we’ll cover binding a simple object to a form and then take a step deeper and bind an object with a list of children to a form. These are basic examples, but should show enough to get you started in most cases, and should be a step beyond what’s available in the examples from Thymeleaf and Spring.
As usual, for this installment, I’ve created a copy of the code from part 2 and created a new project called Part 3. It’s committed to Github, ready for cloning.
The Gizmo
To get started, we’ll create a simple object that will eventually back a form in our app. We’ll call it gizmo, and we’ll give it two String fields with accessors and mutators.
/src/main/java/com.rodenbostel.sample.Gizmo.java:
[code language=”java”]
package com.rodenbostel.sample;
public class Gizmo {
private String field1;
private String field2;
public String getField1() {
return field1;
}
public void setField1(String field1) {
this.field1 = field1;
}
public String getField2() {
return field2;
}
public void setField2(String field2) {
this.field2 = field2;
}
}
[/code]
Passing Gizmo To The View
Next, we’ll make a small change to our SampleController that will allow us to pass a gizmo instance to the browser in place of our previous message.
For this, change the previous version:
src/main/java/com.rodenbostel.sample.SampleController.java:
[code language=”java”]
@RequestMapping("/")
public String index(Model model) {
model.addAttribute("message", "HELLO!");
return "hello";
}
[/code]
to this:
[code language=”java”]
@RequestMapping("/")
public String index(Model model) {
model.addAttribute("gizmo", new Gizmo());
return "hello";
}
[/code]
Updating The View
Next, in place of displaying static text, we’ll update our view template so that it contains a form to which we can bind the instance of Gizmo. I’ll walk through the important bits after the code sample.
src/main/resources/hello.html:
[code language=”html”]
<!DOCTYPE html>
<html xmlns="http://www.w3.org/1999/xhtml" xmlns:th="http://www.thymeleaf.org">
<head lang="en">
<meta charset="UTF-8" />
<title>HELLO</title>
</head>
<body>
<form id="gizmo-form" role="form" th:action="@{/save}" method="post" th:object="${gizmo}">
<div>
<label for="field1">Field 1</label>
<input type="text" id="field1" name="field1" th:field="${gizmo.field1}"/>
</div>
<div>
<label for="field2">Field 2</label>
<input type="text" id="field2" name="field2" th:field="${gizmo.field2}"/>
</div>
<div>
<button type="submit">Save</button>
</div>
</form>
</body>
</html>
[/code]
Notice we’ve create a form and dropped in two “th” attributes – action and object. The th:action attribute signifies to what path the form’s contents will be submitted, and th:object tells Thymeleaf where to find the object to be bound in the response parameters – in our case, in the Model we’re returning with every controller method call.
Also notice the body of the form – we’re using the th:field attribute on the input elements we’ve created. This tells Thymeleaf which fields on the th:object to bind to these inputs.
Last, you may have realized that we haven’t create a method in our controller with an @ResponseMapping that will wire to the th:action we’ve specified… We need somewhere to post this form to.
Adding The Controller Method
Add a new method to your SampleController that will respond to a post issued from our new form
/src/main/java/com.rodenbostel.SampleController:
[code language=”java”]
@RequestMapping("/save")
public String save(Gizmo gizmo) {
System.out.println(gizmo.getField1());
System.out.println(gizmo.getField2());
return "hello";
}
[/code]
Notice that we don’t do anything special to bind the incoming request to our Gizmo model object on the server side. If the properties on the bound object match the request parameter structure, the request will bind automatically. Specialized binding can be accomplished using the @RequestParam annotation.
Also notice that we’re simply printing out the contents of the Gizmo object and rendering the same view again with the same form contents. Alternatively, you can issue a redirect to the “/“ path to clear the form, following the route that is
used when the app is started.
Instead of:
[code language=”java”]
return “hello“;
[/code]
redirect using:
[code language=”java”]
return "redirect:/";
[/code]
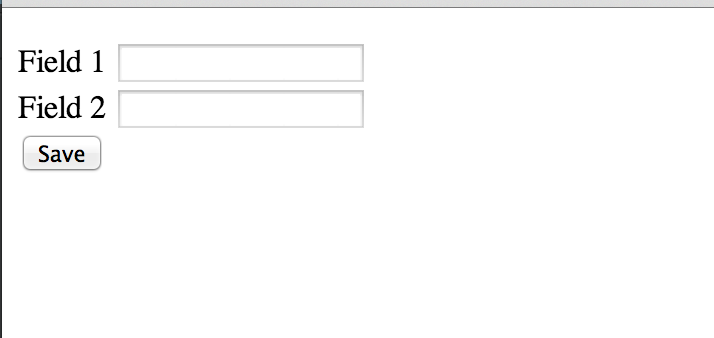
Start up your server to view the work we’ve done so far. You should see an empty form that looks similar to this:
and when you complete the form and submit it, you should see output in your console similar to the following:
2014-05-12 17:26:50.780 INFO 23927 — [nio-8080-exec-1] o.s.web.servlet.DispatcherServlet : FrameworkServlet ‘dispatcherServlet’: initialization completed in 9 ms
hello
world
Binding Child Objects
A common use case involves binding child objects to the same form a parent object is bound to – items on an order, addresses on a user profile, etc. The syntax for accomplishing this in Thymeleaf is a bit messy, mostly due to the fact that this type of binding requires nested, escaped quotation marks to accomplish.
Let’s add a new object to the mix, one that will be the child of Gizmo.
/src/main/java/com.rodenbostel.sample.GizmoChild:
[code language=”java”]
package com.rodenbostel.sample;
public class GizmoChild {
private String childField1;
private String childField2;
public String getChildField1() {
return childField1;
}
public void setChildField1(String childField1) {
this.childField1 = childField1;
}
public String getChildField2() {
return childField2;
}
public void setChildField2(String childField2) {
this.childField2 = childField2;
}
}
[/code]
Another simple class with simple fields. Next, let’s add an iterable collection of these objects to the Gizmo object as a property.
/src/main/java/com.rodenbostel.Gizmo:
[code language=”java”]
package com.rodenbostel.sample;
import java.util.ArrayList;
import java.util.List;
public class Gizmo {
private String field1;
private String field2;
private List<GizmoChild> children;
public String getField1() {
return field1;
}
public void setField1(String field1) {
this.field1 = field1;
}
public String getField2() {
return field2;
}
public void setField2(String field2) {
this.field2 = field2;
}
public List<GizmoChild> getChildren() {
if(children == null) {
children = new ArrayList<GizmoChild>();
}
return children;
}
public void setChildren(List<GizmoChild> children) {
this.children = children;
}
}
[/code]
Updating The View (again)
We’ll add a new section to our form so that we can iterate through the collection of GizmoChildren, creating a row of inputs for each element in the collection, and dynamically naming them so they bind correctly on the server side.
[code language=”html”]
<!DOCTYPE html>
<html xmlns="http://www.w3.org/1999/xhtml" xmlns:th="http://www.thymeleaf.org">
<head lang="en">
<meta charset="UTF-8" />
<title>HELLO</title>
</head>
<body>
<form id="gizmo-form" role="form" th:action="@{/save}" method="post" th:object="${gizmo}">
<div>
<label for="field1">Field 1</label>
<input type="text" id="field1" name="field1" th:field="${gizmo.field1}"/>
</div>
<div>
<label for="field2">Field 2</label>
<input type="text" id="field2" name="field2" th:field="${gizmo.field2}"/>
</div>
<div>
<ul>
<li th:each="item, stat : *{children}" class="itemRow">
<div>
<label th:for="${‘childField1-‘+stat.index}">Field 1</label>
<input type="text" class="form-control quantity" name="childField1"
th:field="*{children[__${stat.index}__].childField1}" th:id="${‘childField1-‘+stat.index}"/>
<label th:for="${‘childField2-‘+stat.index}">Field 2</label>
<input type="text" class="form-control quantity" name="childField2"
th:field="*{children[__${stat.index}__].childField2}" th:id="${‘childField2-‘+stat.index}"/>
</div>
</li>
</ul>
</div>
<div>
<button type="submit">Save</button>
</div>
</form>
</body>
</html>
[/code]
You can see the unordered list’s first child has a “th:each” attribute. That’s Thymeleaf’s comprehension mechanism for collections. The first two parameters – item and stat basically represent the current item in the collection and the state of the iterator at the time the element is being rendered. We can use this stat variable to get the index of the current item being displayed. We also see “*{children}”. This is slightly different from earlier examples and shows how Thymeleaf can scope binding to a parent object. In this case, our form is bound to gizmo, and we can reference it’s property named ‘children’ by using an asterisk instead of a dollar sign.
For each item in the collection, we’re creating two input fields with ids of childField1-[index] and childField2-[index]. You’ll also see the “th:field” attribute used again on these new inputs. In this case we’re building the binding names for these fields dynamically. It’s easiest explained by looking at the generated html.
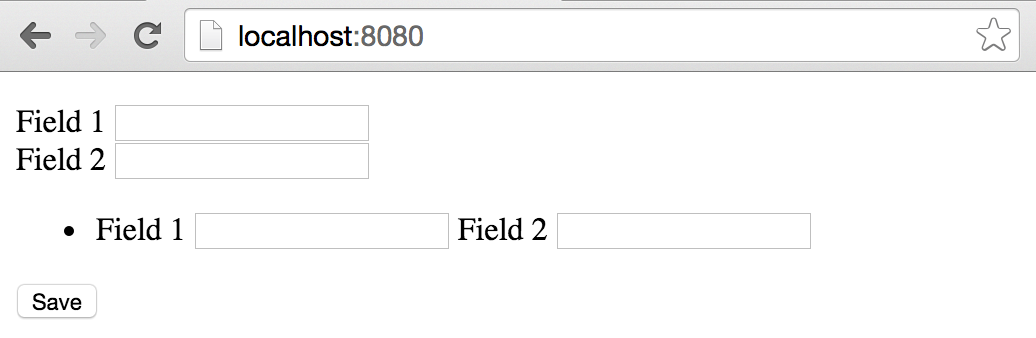
Start your server and let’s look at the output.
The Rendered Product
You should see a form similar to the following after you start your server.
And when we view the source for the same page, we should see something similar to this within our form:
[code language=”html”]
<form id="gizmo-form" role="form" method="post" action="/save">
<div>
<label for="field1">Field 1</label>
<input type="text" id="field1" name="field1" value="" />
</div>
<div>
<label for="field2">Field 2</label>
<input type="text" id="field2" name="field2" value="" />
</div>
<div>
<ul>
<li class="itemRow">
<div>
<label for="childField1-0">Field 1</label>
<input type="text" class="form-control quantity" name="children[0].childField1" id="childField1-0" value="" />
<label for="childField2-0">Field 2</label>
<input type="text" class="form-control quantity" name="children[0].childField2" id="childField2-0" value="" />
</div>
</li>
</ul>
</div>
<div>
<button type="submit">Save</button>
</div>
</form>
[/code]
You can see the names produced by Thymeleaf fit the standard Spring MVC compliant naming for child objects. They are identified uniquely as they would be an plain object notation.
Let’s update our controller to add a GizmoChild instance to our Gizmo on initial request, and print out our new child’s output on response:
/src/main/java/com.rodenbostel.sample.SampleController.java:
[code language=”java”]
package com.rodenbostel.sample;
import org.springframework.stereotype.Controller;
import org.springframework.ui.Model;
import org.springframework.web.bind.annotation.RequestMapping;
import org.springframework.web.bind.annotation.RequestParam;
@Controller
public class SampleController {
@RequestMapping("/")
public String index(Model model) {
Gizmo gizmo = new Gizmo();
gizmo.getChildren().add(new GizmoChild());
model.addAttribute("gizmo", gizmo);
return "hello";
}
@RequestMapping("/save")
public String save(Gizmo gizmo) {
System.out.println(gizmo.getField1());
System.out.println(gizmo.getField2());
for(GizmoChild child : gizmo.getChildren()) {
System.out.println(child.getChildField1());
System.out.println(child.getChildField2());
}
return "redirect:/";
}
}
[/code]
As you can see, in our index method, we’re adding a child object to our Gizmo instance prior to adding to our model for display on the screen. Then, in the ‘save’ method, we’re looping through the collection of children and printing the output to our console. With our server running, by completing the form and submitting, we should see first our Gizmo’s properties, followed by the values for the fields on each child object.
Conclusion
Although this is a simplified example, this can easily be expanded to accommodate more complex use cases. Maybe you’re reading your Gizmos from a database, or maybe you need to create new Gizmos from scratch. The child collection needs to be instantiated for the Thymeleaf template to render correctly – it can be empty though. Having one child element in a collection in a new Gizmo object gives Thymeleaf a blank object to render. However, the fields Thymeleaf renders for that blank object could be created by jQuery (or another javascript library), and can be further added/removed from there.
In my next blog post I will discuss internalization in Spring Boot.


