12 Steps to Password Recovery for RHEL, CentOS 7 Linux

Forgot your RHEL 7 or CentOS 7 Linux root password? Did you recently inherit one of these systems but do not have a way to log in? If you have access to the console, be it physical or using whatever Hyper-Visor tools, you may be able to perform a root password recovery procedure.
Please note that this procedure must be performed from a console session. We also assume the system is using the default grub2 bootloader and grub is not being password protected. Lastly, this procedure cannot be accomplished over any SSH remote session. Being able to see the grub bootloader boot options is essential and using the procedure below, it can only be done through a console session.
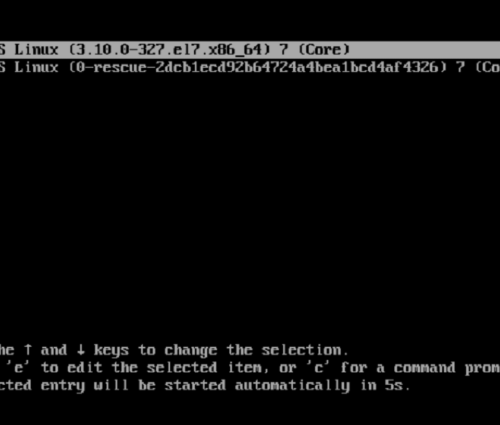
1. Power up / reboot
The first step is to power up or reboot the system and edit the grub2 parameters. Timing here is critical. You must press ‘e’ before the menu times out and boots normally.
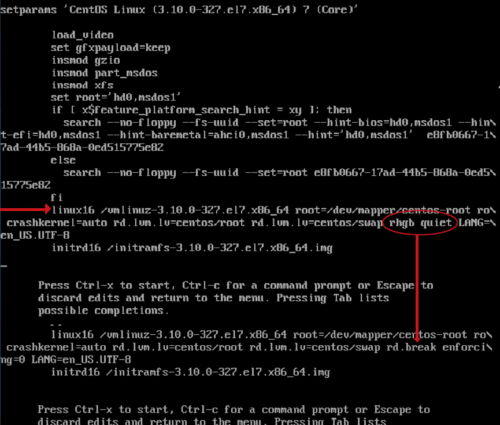
2. Linux16
Look for a line that mentions linux16 (or linuxefi if you are using UEFI bios). You may need to use the arrow keys to scroll down. At the end of the linux16 or linuxefi line, find and replace the rhgb quiet parameters with rd.break enforcing=0
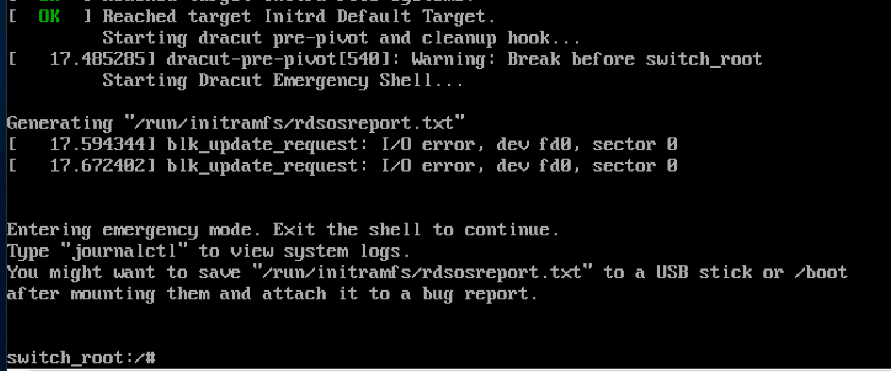
3. Start boot process
Once you have edited the parameters accordingly, hit CTRL-X to start the boot process with the new parameters. The system should boot into the root system.
4. Remount as read/write
Enter the following command to remount the sysroot filesystem as read/write: mount -o remount,rw /sysroot

5. chroot into sysroot
Now we chroot into the sysroot, using the following command: chroot /sysroot

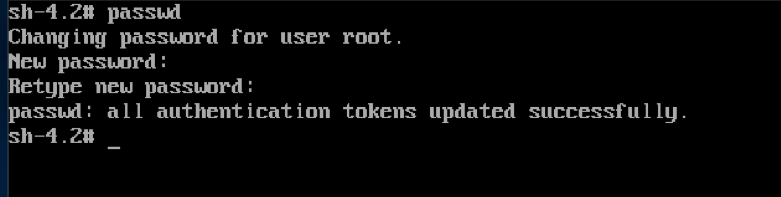
6. Change the password
We can use the passwd command to change the root password.
7. Return to switch_root
Issue the following command to bring us back to the switch_root:/# prompt: exit

8. Remount to read-only
Enter the following command to remount the sysroot filesystem as read-only once again: mount -o remount,ro /sysroot

9. Exit the session
Now we can exit the session and allow the system to reboot using the following command: exit

10. Boot and login
Allow the system to boot normally and login as root using the new password that you set in step 6.

11. Clean up
We must clean things up a bit before rebooting again or doing anything else with the system. First, let’s update the /etc/shadow file by issuing the following command: restorecon /etc/shadow

12. Set SELINUX
Finally we set our SELINUX back to enforcing mode by issuing the following command: setenforce 1
